Friday, July 9, 2010

Cream Cheese Pie

I found this Paula Deen recipe for Cherry Cream Cheese Pie a few months ago and it turned out amazing (from Paula Deen, would you expect anything less?!). So, I thought I would make it again, but with a little twist for the Fourth of July. Simply trade the cherry pie filling for fresh berries, and you will get a fresh, delicious summer treat.

Here is Paula's recipe, just slightly modified:


Ingredients
1 (8 ounce) package light cream cheese, at room temperature
1 (14 ounce) can light sweetened condensed milk
1/2 cup fresh lemon juice (fresh is very important)
1 teaspoon vanilla extract
1 (9-inch) graham cracker pie crust
2 cups chopped berries -- strawberries, blueberries

Directions
In either a stand mixer fixed with a paddle attachment or using a hand held electric mixer, cream the cream cheese until light and fluffy, about 3 to 5 minutes. Slowly add the milk mixing on low speed until well combined. Stir in the lemon juice and vanilla and pour into the crust. Place the pie into the refrigerator for at least 2 hours up to overnight, until well chilled and set.


Top the pie with the berries just before serving.


Monday, June 28, 2010

Baptism Cookies


When asked to make cookies for two little girls' baptism celebration, I jumped at the chance...then quickly realized that I don't exactly have cookie cutters in my collection that really fit that theme. I bought a cross cookie cutter (the obvious choice) and then settled on two other designs that I already had cutters for, to accompany the cross cookies.

I knew I wanted to have a lamb somewhere in the overall theme, but could not find a cute lamb cookie cutter. All of them were more or less farm animal shapes, so I opted to paint little lambs/sheep onto a simple round cookie with each of the girls' names on them. I really like how they turned out -- those cute little fluffy things!


Last but not least, I decided on a cute daisy design to tie the whole thing together. This was by far the most time-consuming cookie, just FYI. I know, hard to believe, but it is true. Why? I thought you may ask. Because the center was a different color, and because I 'flooded' each petal, that meant I had to individually pipe the border for each and every petal, then flood each one separately without interfering with the yellow center.  I love these daisies but whew they are not for the weak of heart (or hand).


So, what do you think??

(SSH kudos to Sarah for diving into sugar cookie decorating with a fury...and some really great results!)

Thursday, June 17, 2010

Cookies...Again!

This week, I made my first ‘order’ of sugar cookies for a luncheon in honor of two new little bundles of joy. I really, really enjoyed decorating these cookies, and was enlightened on how many baby-themed cookie cutters there were out there. Unfortunately, this was a rush order and I didn’t get to search for more than the cutters I already had, so these are pretty basic, but I still love them nonetheless. It forced me to go a little above and beyond on the simpler shapes!


Once the cookies are cool (I let mine sit overnight in an airtight container), pipe a border for the shape you want to create.


That will need to dry for a while so it creates a wall to contain your flood icing. I usually outline all of my cookies and then go back for decorating them. Once dry, you can use the thinned-out icing to ‘flood’ them. I prefer to use a spoon to pour some icing onto the cookie, then spread it out evenly, making sure that it touches the border.

If you want a flat design, you should flood one or two at a time, and no more than that, so you have time to go back in and add your other designs before the flood icing dries. If you wait to long, any icing that you add to the cookie will be raised.


To do polka dots, just drop a contrasting color of icing, thinned out, onto the wet flood icing. Just know that wet icing will expand a little bit, so don’t put the dots too close together, or make them too big!

If you want to do ‘pearls’ around the edges, wait until the flood icing is dry before you put the dots on the cookie. If you want the dots a little bit above the surface, wait until the flood icing is almost dry before doing the dots, so that they are rooted in the icing, but are still raised above the surface.


Letters are a pain and there are some good tips out there on how to make a good looking monogram or something but I say practice, practice, practice (and use a good, clean icing tip). I think mine turned out okay, but I need some more practice...which I will get lots of as I next week with another baby-themed order!

Happy baking!

Saturday, May 15, 2010

Sinful Chocolate Cupcakes, From Hershey's


This recipe is not my own, I must admit. It actually comes right off the back of a Hershey's Cocoa can! BUT don't let it fool you, Hershey's knows chocolate and these cupcakes are amazing. The recipe is for 'Perfectly Chocolate' Cake with 'Perfectly Chocolate' frosting - you are going to love it!


Ingredients:
2 cups sugar
1-3/4 cups all-purpose flour
3/4 cup HERSHEY'S Cocoa
1-1/2 teaspoons baking powder
1-1/2 teaspoons baking soda
1 teaspoon salt
2 eggs
1 cup milk
1/2 cup vegetable oil
2 teaspoons vanilla extract
1 cup boiling water

Directions:
1. Heat oven to 350°F.
2. Stir together sugar, flour, cocoa, baking powder, baking soda and salt in large bowl. Add eggs, milk, oil and vanilla; beat on medium speed of mixer 2 minutes. Stir in boiling water (batter will be thin).
3. Line muffin cups (2-1/2 inches in diameter) with paper bake cups. Fill cups 2/3 full with batter. Bake 22 to 25 minutes and let cool completely. Makes about 30 cupcakes.


"PERFECTLY CHOCOLATE" CHOCOLATE FROSTING

1/2 cup (1 stick) butter or margarine
2/3 cup HERSHEY'S Cocoa
3 cups powdered sugar
1/3 cup milk
1 teaspoon vanilla extract

Melt butter. Stir in cocoa, then alternately add powdered sugar and milk, beating to spreading consistency. Add small amount additional milk, if needed. Stir in vanilla. Makes about 2 cups frosting.
 
 
Now for the fun part - frosting the cupcakes! I made regular and mini cupcakes, and even frosted some with cream cheese icing. This tool, mentioned in an earlier post, makes frosting cupcakes easy, and they look great!
 

Tuesday, May 4, 2010

Organic Mushroom Ravioli - Fresh and Fast


I have been working my butt off lately at work, and consequently my husband has been doing a lot of the cooking. So tonight, it was my turn! I bought some Rising Moon Organic Ravioli at Whole Foods last weekend and was excited to make it tonight. The kind I made was Wild Canterelle Mushroom, and I added a market-fresh mushroom-garlic-herb-parmesan topping (because I ran out of cream, and also because I didn't feel like a heavy sauce for this pasta). It really made for a very yummy (vegetarian) hodgepodge of a dinner, so I thought I would share.

Make the ravioli as directed on the package. While the pasta is cooking, sautee chopped mushrooms with minced garlic in some EVOO. Salt and pepper the mushrooms and then add a splash of sherry vinegar (from Jerez de la Frontera, preferably!). Once the mushrooms cook down, turn down the heat and set aside. Drain the pasta after 8 minutes of cooking and toss in a medium bowl with some EVOO (enough for coating).

Chop the herbs of your choice and mix in with the pasta - I used chopped oregano and parsley but basil would be superb! Mix the mushrooms in with the pasta, add about 2 tbs of Italian breadcrums, then plate your pasta. Sprinkle parmesan cheese on top and viola!

I think the whole meal took MAYBE 20 minutes. And it was perfect for our house of two! Enjoy :)

Tuesday, April 13, 2010

Frosted Animal Cookies

Lions, Tigers and Hippos, Oh My!


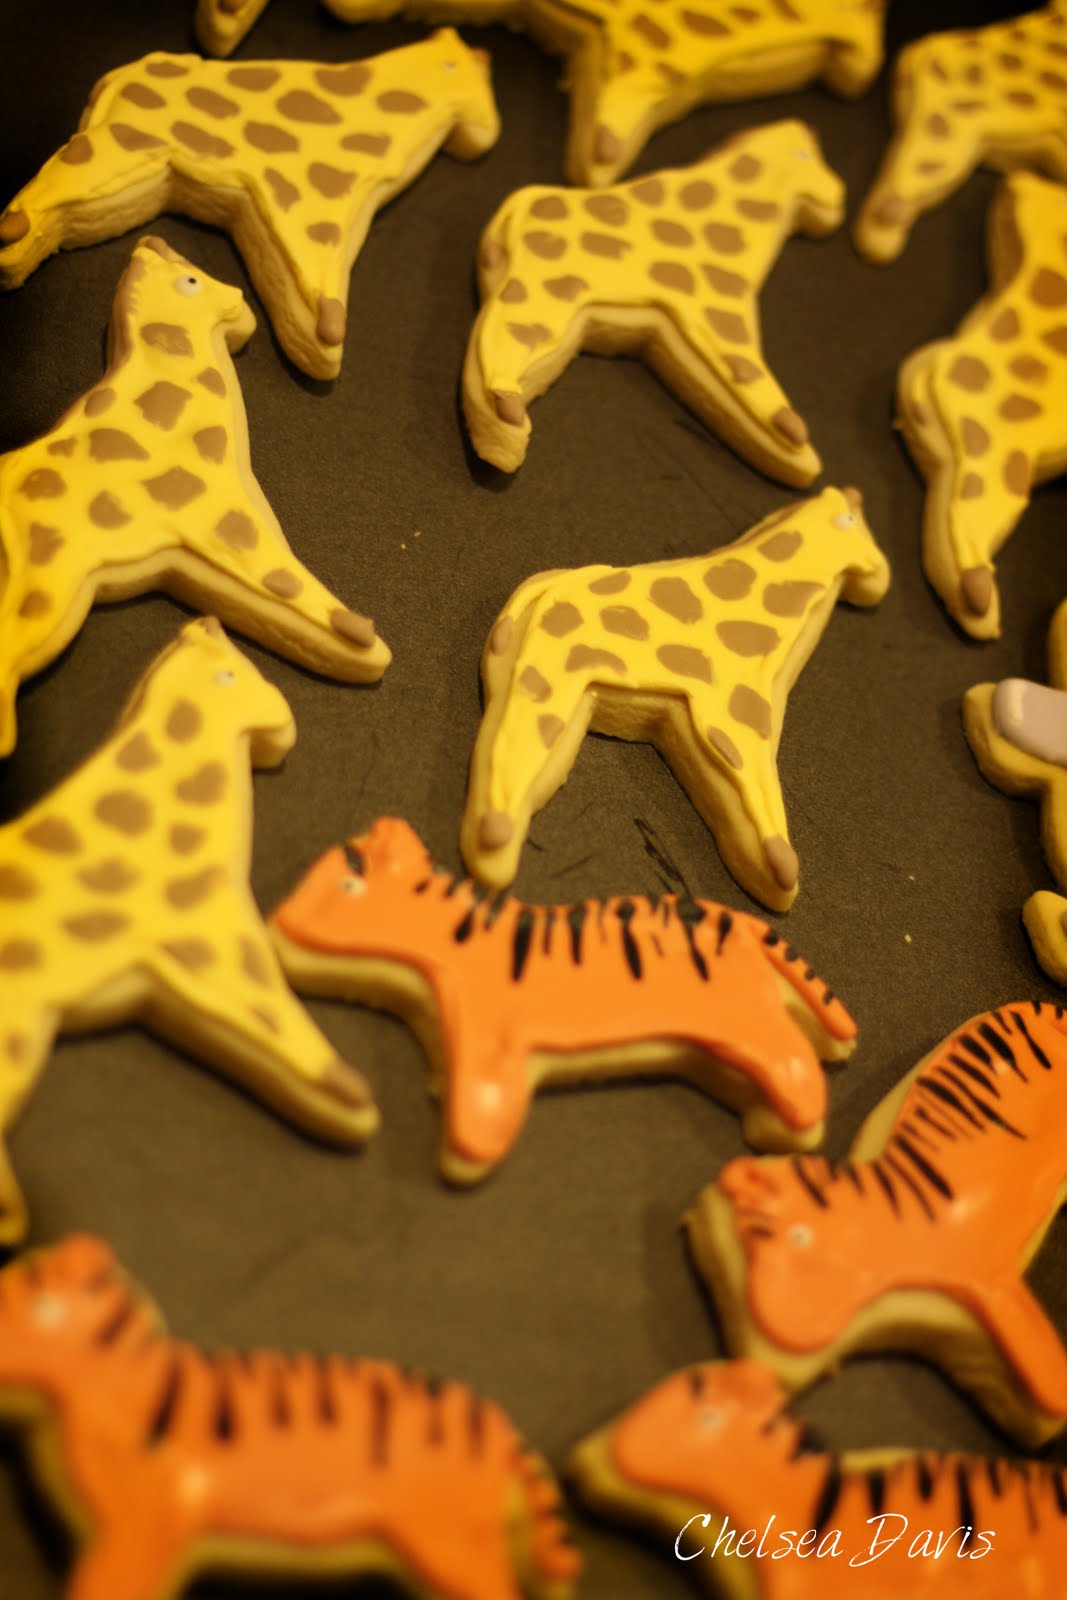
I made some frosted animal cookies last weekend for my nephew's first birthday party and they turned out SO CUTE (if I do say so myself!). I used the same cookie recipe that I blogged about before, when I made some sugar cookies for Valentine's day, but they were decorated pretty modestly and this time around I thought I would go bold :)

I am just going to share some pics of the cookies with you, and at the request of my friend, Sarah, I am going to provide you with some of my favorite tips and tricks for making some really great iced cookies. If you would like to get the recipe for the cookies, or the icing, click here. Just note that I used a different royal icing recipe this time around, found here.

So...where do you start?

I always start with outlining the area that I am going to 'flood' or fill.  That way, you have a border for your design, you can control where the icing goes {the outline serves as a frame or a dam for the icing so that it doesn't spill out of the designated area}, and you have a clean, finished design. Use an icing bag/Ziploc with a hole, or squeeze decorator bottles so you get a good, controlled line. You can see the outline in some of my cookies, though it blends with the flooded icing. Some cookie decorators use a different color for their outline than their flood color, which can be cool too. Just pick whatever works for your design, and make sure to let it dry before you flood! :)

Same Color Border

Different Color Border
Photo from Bake at 350 Blog

Once the border sets, you are free to start flooding! The key is to make the icing thin enough to spread easily, but not too thin that it doesn't give the cookie a nice coating. I prefer to use a spoon when I put the flood icing on the cookie because it is easier to spread and move around. I just place some icing on the cookie and use the spoon to push the icing into the areas of the cookie, and right up to the border. You can always add more, if needed.

Some details/decorations should be done while the flooding is still wet, which means you have pretty much have to work cookie to cookie instead of flooding all of them and then doing the detailing. For example:

Stripes, Dots or Spots...

...and any detailing that you want to be flush and not raised

Like a lion's mane

Monkey paws and funny face

Elephant and hippo toes

Or simply swirls
This Photo from Bake at 350 Blog


I do love the look of monochromatic decorating, and sometimes I think it is necessary. For example, when I did the ears on my elephant cookies, it would have looked weird if I did the ear outline in a different color than the elephant's body, so I used the same icing (NOT thinned out), and just piped the ear design right onto the dried icing. It is a subtle design element, but sometimes less is more!


It works really well when doing classy cookies, like these, from Bake at 350 Blog:


When doing the eyes for the animal cookies, I really wanted them to 'pop' {not literally!}, so I added the eyes last, to make them raised a bit. I used a toothpick and dipped it into the white icing, then onto the cookie. For the black dot, I did the same thing, but didn't use a lot of icing, and very gently dabbed the toothpick into the white dot, so it would be one piece.


Here are a few tips to remember when making the cookies:
  • After you make your cookie shapes and have them arranged on a baking sheet, put them in the refrigerator for a few minutes so they are chilled. Once you are ready to bake them, put them straight from the fridge into the hot oven. This will keep the cookies from puffing up too much or spreading, so the shape is still defined.
  • Keep a damp paper towel on top of any bowls of royal icing that you are not using. It will keep it from drying out.
  • If you thin your icing out and then decide it is too thin, or that you need thicker icing for decorating, just leave it out for a little bit and the icing will begin to thicken.
  • Warm water seems to work better when adding to the icing to make it thinner.
  • When mixing colors, search online for color combinations to use. I just have the standard colors, and brown and black were harder to make and more time consuming. I recommend searching for a good food color that you can just use and do not have to worry about mixing to death.
  • I recommend using a tabletop mixer when making the icing. You have to mix for a little while before the icing is ready and it is nice to just turn the mixer on and walk away.
  • If you make mistakes with the icing, you can usually just wipe it off {but you have to react quickly}. This works especially well when you are piping decorations onto already-hardened icing. Just gently wipe clean if you mess up on a small area. Larger areas...good luck... :)
  • I prefer to pick up the cookies when I do the outlines and fill them, but you can lay them out on a cookie sheet and do them like that as well.
  • Leave the cookies out to dry overnight, in a dry, cool place. If they get warm or there is moisture in the air, they can take a while to dry, or worse - dry with spots or weird lines.
I think that about covers it. If you have any questions, just let me know!! Good luck with your cookie-making!

I will be making some more iced cookies next week with my mother-in-law, for a couples shower, and I am really excited to do some simple, elegant designs. I will post the results of that session soon, and I promise to include step-by-step instructions on decorating techniques.

Tuesday, March 23, 2010

Tomato, Mozzarella and Basil Sandwich

We have been trying to eat healthier and thought this would make a yummy lunch this past weekend. We were right! This sandwich was AMAZING, so I am sharing the simple recipe with you in hopes that you will not only make it, but indulge in it as well :)


Ingredients

Foccacia Bread, sliced about 1" thick
Tomato
Basil Leaves
Fresh Mozzarella
Extra Virgin Olive Oil
Salt & Pepper to taste

Directions

Heat your panini press/grill/grill pan to medium-high heat. Drizzle one side of the foccacia bread pieces with the EVOO, turn upside-down and set aside. Place the tomato slices (as many as you like) on one of the pieces of bread and then stack the mozzarella on top of the tomato. Arrange a few basil leaves on the mozarella and sprinkle with salt and pepper.


Put the second piece of bread on top of the sandwich, EVOO-side up so that the sandwich doesn't stick to the grill. Once heated, set the sandwich on the grill and close the panini press. Allow time for the bread to get golden in color and for the cheese to melt, about 8 minutes. Keep an eye on the sandwich though as cooking times may vary.


Your result: DE-Licious!

Wednesday, March 17, 2010

Chocolate Peanut Butter Cups

I am currently reading Jonathan Safran Foer's book Eating Animals and as a result, am trying to eat healthier foods. I am also trying recipes that are vegetarian {for the first time, at least with that type of cooking specifically in mind}.

While reading Eating Animals, I came across this book at Barne's and Noble and then saw Alicia Silverstone on Oprah talking about her recipes. Oprah liked a lot of the food that came from Alicia's recipes, so I figured if SHE liked the food, then I can at least give it a try! Alicia's book is about vegan cooking and eating healthier while helping our planet. I skimmed through it and it looks very interesting.


My first recipe to attempt this weekend will be her Chocolate Peanut Butter Cups. Here is the recipe in case you want to try them with me! I will post my results {and opinions about the finished product} next week.

Oh, and HAPPY ST. PATRICK'S DAY!


SERVINGS - 12

INGREDIENTS

1/2 cup Earth Balance butter
3/4 cup crunchy peanut butter (preferably unsweetened and unsalted)
3/4 cup graham cracker crumbs or 10 graham cracker squares
1/4 cup maple sugar or other granulated sweetener
1 cup grain-sweetened, nondairy chocolate or carob chips
1/4 cup soy, rice, or nut milk
1/4 cup chopped pecans, almonds, or peanuts

PREPARATION

1. Line a 12-cup muffin tin with paper liners. (If You Care makes unbleached liners made from recycled paper.) Set aside.

2. Melt the butter in a small saucepan over medium heat.

3. Stir in the peanut butter, graham cracker crumbs, and maple sugar and mix well.

4. Remove the mixture from the heat. Evenly divide the mixture, approximately 2 tablespoons per cup, among the muffin cups.

5. Combine the chocolate and milk in another pan. Stir over medium heat until the chocolate has melted.

6. Spoon the chocolate evenly over the peanut butter mixture.

7. Top with chopped nuts.

8. Place in the refrigerator to set for at least 2 hours before serving.


Excerpted from The Kind Diet by Alicia Silverstone (2009, Rodale). All rights reserved. See more of Alicia Silverstone's vegan recipes

Thursday, March 4, 2010

Tacos Pescado - Ole!

In an effort to will the warmer weather in {and celebrate the sixty-something degree weather we have been getting lately}, I decided to make one of my favorite dishes to eat on an outdoor patio, sipping a Corona and listening to live music: Fish Tacos! I love them with shrimp, mahi-mahi, talapia - you name it. The rendition I made uses talapia fillets and features a yummy 'slaw' inside, a version of my sister-in-law's famous Texas Two-Step Coleslaw {I can't give away her actual recipe without her permission, but this version is very close}.

This recipe will yield two tacos per person, but you can definitely double-up when hosting friends.


Ingredients:
2 talapia fillets
1 tbs soy sauce
1/4 c. orange juice
1 tbs olive oil
Salt and pepper to taste
4 corn tortillas

Slaw Ingredients:
1 c. finely chopped green cabbage
1/2 c. finely chopped red cabbage
1/4 c. chopped cilantro
1/2 jalapeno, finely diced
1 8oz can Mexicorn, drained
2/3 c. shredded cheddar cheese
1/4 c. ranch dressing

Put the talapia in a bowl with the soy sauce, olive oil, orange juice, and salt and pepper. Toss the fish in the sauce and let it sit while you prepare the slaw.

Mix the cabbages, cilantro, jalapeno, Mexicorn and cheese in a bowl. Add the ranch dressing, mix well, and set aside.

Heat a large skillet over medium heat and drizzle lightly with olive oil to coat the bottom. When the pan is hot, place the talapia in the skillet and cook 3-4 minutes on each side. Once the fish is done, cut each fillet down the middle, lengh-wise. Place one part of the fillet on a corn tortilla. Scoop a little of the slaw on top of the fish, roll the tortilla and secure with a toothpick. Do the same for each of the talapia pieces, serve with a yummy rice, grilled veggies, or even a fresh salad, and enjoy!

Monday, February 22, 2010

Easy Cheesy Alfredo


My husband and I were making fettucine alfredo the other night for dinner and realized we didn't have alfredo sauce (pre-made). But I did have some cream, basil, garlic, and a few other ingredients, so I decided to try my hand and whip something up. It turned out delicious so I thought I would share. The ingredients list is simple, the prep work is easy (and can be manipulated for your own preferences), and the result is definitely pasta-worthy.

Ingredients
2 tbs butter
2 tsp minced garlic
3/4 c. heavy cream
1/4 c. chopped basil
1/2 c. parmesan
salt and pepper to taste

Melt butter in a skillet over medium heat. Add minced garlic and cook until garlic starts to brown (careful not to burn!). Add the cream and whisk together over high heat so the sauce starts to boil. Add basil and cook about 5 minutes. Reduce heat and add the parmesan cheese, salt and pepper to taste. Note: you can increase the amount of garlic, basil, or parmesan depending on your tastes.

Pour the alfredo over your favorite pasta (I used some whole wheat and regular farfalle - it was all we had left!) and enjoy. You can add panchetta, peas, chicken - anything to make the dish yours.

I hope you decide to try this one out, maybe with a good Viognier. It's a winner in our house :)

Tuesday, February 16, 2010

Sugar Cookies & Royal Icing

I was waiting to post a good first entry and since Valentine's wasn't too long ago, I decided to share this AMAZING sugar cookie recipe (perfect for iced cookies) and an accompanying royal icing recipe. First thing's first though - sharing with you a fabulous find, which helped me immensely in this cookie-making process:

The BeaterBlade
An attachment for your stand mixer (most major brands) that scrapes the bowl as it mixes!


I love this fab find! My KitchenAid is used about 98% of the time for baking, and I always have to stop the mixing process to scrape the bowl. This little contraption totally eliminates that hassle, scraping the bowl for you! Love love love it :) I tried to find it at Williams Sonoma but they were out (with no hopes of getting more) so I found this one at Sur La Table for about $25. A little steep I suppose, but it will serioiusly come in handy!

Now for the cooking....I read the Bake at 350 blog pretty often to get great inspiration for my baked goods, and since she specializes in decorative cookies I thought it only appropriate to use her sugar cookie recipe. You can tell it has been tweaked and is absolutely perfect for cookies for decorating - sturdy, tasty, beautiful color.


Vanilla-Almond Sugar Cookies

3 c unbleached, all-purpose flour
2 tsp baking powder
1 c sugar (I use sugar that I've stored vanilla beans in)
2 sticks butter
1 egg
1/2 tsp pure vanilla extract
1/2 tsp pure almond extract

Preheat oven to 350. Combine the flour and baking powder, set aside.


Cream the sugar and butter. Add the egg and extracts and mix.


Gradually add the flour mixture and beat just until combined, scraping down the bowl, especially the bottom (unless you have the BeaterBlade! Look at that clean bowl!).


Roll onto a floured surface and cut into shapes.


Place on parchment lined baking sheets and bake for 10-12 minutes.


Let sit a few minutes on the sheet, then transfer to a cooling rack.


Now the royal icing, that was a bit of an internal conflict for me. See, my family makes homemade Christmas cookies and icing every year, and this year I did royal icing instead of the usual 'powdered sugar and water' mix. I LOVED it, and it worked very well. So when I came across a few other recipes requiring meringue powder instead of egg whites, I got nervous. I decided to try out the meringue powder recipe, just for comparison's sake, and it turned out just fine. My only issues - less flavor, and the meringue powder is probably not likely to be hanging out in your pantry. So here is the recipe I prefer, compliments of the Food Network:

2 large egg whites
2 teaspoons fresh lemon juice or 1 teaspoon vanilla extract
3 cups confectioners' sugar, sifted
Food coloring, if desired

With an electric mixer, beat the egg whites with the lemon juice or extract until frothy. Add the sifted powdered sugar and beat on low speed until combined, smooth, and shiny. Turn to high and beat approximately 5 minutes till stiff and glossy. Add food coloring, if desired, and transfer to a pasty bag to pipe onto cookies.

And here is the recipe that I used:

3 3/4 c. powdered sugar, sifted
4 TBSP meringue powder
scant 1/2 c. water


With your trusty mixer, beat the meringue powder and water until frothy. 


I gradually added the sifted powdered sugar, beating on low.


Once all of the powdered sugar is incorporated, beat on high for five minutes until stiff peaks begin to form. A good rule of thumb - the icing should stand up on the edge of the beater. 


Put the icing into a bowl if you plan to use food coloring to change the color. If not, you can put it directly in an icing bag. If using food coloring, make sure that the icing is covered with a damp cloth as to prevent drying and solidifying.


Now you can decorate the cookies however you want! I did some piping (using an icing bag and some ziploc baggies with a hole cut in the corner....what? They both work!). I also attempted some 'flooding' - filling in the outline with icing that has been slightly watered down so that it spreads quicker. They were so much fun that I even made some butterflies for my sister's birthday.


I hope you store these recipes away in your recipe box, and maybe consider getting yourself a BeaterBlade; you could be whipping up some great looking (and tasting) cookies in no time!

Thanks for checking out the Sassy Southern Housewife! Enjoy!